
Knowing how to clean your own upholstery comes down to a few essentials: figuring out what your fabric is made of, doing a quick spot test, and choosing the right cleaning solution. This isn't just a matter of scrubbing at a fresh spill; it’s about having a process that protects your furniture and breathes new life into your home.
Why Bother Cleaning Your Upholstery?
Beyond just making things look presentable, understanding how to clean upholstery is a key part of looking after your home. Over time, that favourite sofa or armchair becomes a magnet for dust, skin cells, crumbs, and all sorts of allergens. These particles don't just sit on top; they work their way deep into the fabric fibres.
A proper clean does much more than get rid of a visible stain. It can dramatically improve your home's air quality by pulling out all those trapped pollutants. For any family, but especially those with pets or allergy sufferers, regular upholstery cleaning can make a real difference to their day-to-day comfort.
Extending the Life of Your Furniture
Regular maintenance is the secret to making your furniture last. Think of dirt and grit as tiny pieces of sandpaper. Every time you sit down, these particles grind against the fabric, causing friction that leads to thinning, fraying, and fading far sooner than you’d expect.
By getting rid of this abrasive buildup, you are actively protecting the fabric's structure and colour. This simple, proactive step can save you a significant amount of money in the long run by pushing back the need for expensive reupholstering or a complete replacement.
The UK's cleaning industry is enormous, employing over 1.47 million people. This shows just how much value we place on having clean, healthy spaces and highlights the demand for both professional help and effective DIY solutions.
The Value of DIY vs Professional Services
Learning this skill yourself means you can tackle messes right when they happen, stopping a small spill from turning into a permanent, ugly stain. While there's absolutely a time and place for calling in the professionals, handling the routine upkeep yourself is both budget-friendly and satisfying.
If you're weighing up the pros and cons, it helps to understand what the experts do. You can find out more about what's involved in professional https://www.agcarpetspecialist.co.uk/upholstery-cleaning/ to see how it compares. This guide will give you the confidence and know-how to get fantastic results all on your own.
Right, before you even think about getting a cloth wet, the very first thing you need to do is a bit of detective work.
Have a good look around your furniture – usually tucked under a cushion or hidden along a seam – for a small tag. This tag holds the key: a single letter that acts as the manufacturer's strict set of rules for cleaning. This is your furniture's cleaning code.
Trust me when I say that ignoring this code is the quickest route to disaster. One wrong move and you could be left with permanent water rings, blotchy discolouration, or even shrunken fabric. It’s a costly mistake.
Let’s break down exactly what these codes mean so you can tackle the job with confidence.
What the Four Main Upholstery Codes Mean
Each code tells you precisely which cleaning agents are safe for your fabric. Think of it as a compatibility chart for your sofa. Getting this right from the very beginning is everything.
You’ll find these codes on a small white tag attached to your furniture. It can feel like a bit of a treasure hunt, but finding it is crucial before you start. Here is a quick reference guide to help you make sense of it all.
Upholstery Cleaning Code Cheat Sheet
| Code | Meaning | Safe Cleaning Method |
|---|---|---|
| W | Water-Based | Safe to clean with water-based shampoos or foam upholstery cleaners. The easiest to work with. |
| S | Solvents Only | Use only solvent-based, water-free dry cleaning products. Water will damage it. |
| W/S | Water or Solvent | You can use either a water-based or a solvent-based cleaner. Always best to spot test first. |
| X | Vacuum Only | Do not use any liquids. Clean by brushing or vacuuming only. For stains, call a professional. |
A quick look at this table shows just how different the cleaning methods can be. Now, let’s dig a bit deeper into what each one really means for you.
-
Code W (Water-Based Cleaner): This is the one you’re hoping for. ‘W’ stands for water, meaning you can safely use water-based cleaning solutions. These are the fabrics that respond well to most gentle upholstery shampoos or even a simple mixture of mild detergent and water.
-
Code S (Solvent-Based Cleaner): The ‘S’ means solvents only. For these fabrics, water is the enemy. Using it on an 'S' code material will almost certainly lead to nasty water stains and browning that are often impossible to shift. You’ll need a specific dry-cleaning solvent made for home upholstery.
-
Code W/S (Water or Solvent): This hybrid code gives you options – you can use either a water-based or a solvent-based cleaner. While that sounds great, these fabrics can be a bit temperamental. I often find it's safer to stick with a solvent cleaner or, at the very least, be incredibly thorough with your spot-testing in a hidden area.
-
Code X (Vacuum Only): This is the most restrictive of all. An ‘X’ on the tag means do not use any liquid cleaners. No water, no solvents, nothing. Your only safe bet is to vacuum and brush the fabric. If you have a spill or a stain on an ‘X’ code fabric, it’s time to call in a professional.
My Biggest Piece of Advice: Always, always find and read that manufacturer's tag before you start. It’s the single most important step in protecting your furniture. Assuming you can tell the fabric type just by looking at it is a gamble you don’t want to take.
A Real-World Example
Imagine the scene: you’ve just spilt red wine on a lovely linen-blend sofa. Panic sets in. If the tag says ‘S’, grabbing a damp cloth would be a catastrophe, locking the stain in and leaving a giant water ring for good measure. Instead, you'd need to reach for a dry-cleaning solvent and carefully blot the stain away.
On the other hand, if a muddy paw print appears on your polyester couch and the tag says ‘W’, it's a much simpler fix. A good water-based cleaner and a microfibre cloth will sort it out.
Understanding these codes transforms that moment of panic into a clear, manageable plan. It’s the difference between saving your sofa and ruining it.
Assembling Your DIY Upholstery Cleaning Kit

You don't need a professional's van full of gear to get great results, but having the right tools on hand makes all the difference. It's the key to turning a frustrating job into a truly satisfying one. Think of this as your practical guide to building a solid kit, ensuring you’re ready for routine upkeep and those inevitable spills.
The foundation of any good clean starts with a powerful vacuum cleaner, but the real star is the upholstery attachment. This little tool is designed to get right into the seams and crevices where dirt loves to hide. Your standard floor head simply can't compete.
After vacuuming, your choice of cloths is more important than you might think. Always reach for white microfibre cloths. Unlike cotton which often just pushes dirt around, microfibre’s unique structure actively traps and lifts grime away from the fabric. Using white cloths is a simple pro tip to prevent any accidental colour transfer onto your light-coloured furniture.
Essential Tools For The Job
Your kit should be simple but effective. These are the non-negotiables I recommend having before you start any upholstery cleaning project. They are versatile, affordable, and will serve you well for many other jobs around the house.
- A Soft-Bristled Brush: This is your secret weapon for agitating dirt. Use it to gently work your cleaning solution into the fabric or to brush away dried debris without snagging or damaging the fibres.
- Spray Bottles: You’ll want at least two—one for your cleaning solution and another filled with clean, distilled water for rinsing. This gives you much better control over how much liquid you're applying.
- A Bucket: It sounds basic, but it's essential for mixing your cleaning solution or for rinsing out your cloths as you work.
Having these core items means you can tackle most common upholstery cleaning jobs without a last-minute dash to the shops. It’s about being prepared to act quickly, especially when a fresh spill occurs.
Choosing Your Cleaning Solution
This is where you have a key decision: go with a store-bought product or mix your own? For those who value convenience, there's a huge selection of commercial cleaners available. When building your kit, you might want to check out a new cleaning range for your home that could offer specialised products for your needs.
However, a homemade solution can be just as effective and is often much cheaper. A simple mix of clear washing-up liquid and warm water is a fantastic starting point for fabrics with a 'W' code. For a bit more cleaning power, a solution of equal parts white vinegar and water can work wonders on tougher spots and helps to neutralise odours.
For a deeper dive into different recipes and techniques, our complete guide to upholstery cleaning DIY offers even more options. The most important thing is to always match your chosen solution to your fabric's cleaning code to avoid any damage.
Your Guide to a Deeper Upholstery Clean
Right, you’ve sorted your cleaning codes and gathered your tools. Now for the satisfying part—putting it all into practice and bringing your furniture back to life. We’ll work through this methodically to make sure the clean is both safe and effective.
The first, non-negotiable step is a proper vacuum. Don't just give it a quick once-over. Use your upholstery attachment to get right into every seam, crevice, and corner where dirt and crumbs love to hide. I always start at the top and work my way down, ensuring every inch of fabric gets a thorough going-over.
The All-Important Spot Test
Before you even think about applying a cleaning solution—whether it’s a DIY mix or a shop-bought product—you absolutely must do a spot test. This simple check is your best defence against a cleaning disaster.
Find an inconspicuous area on your furniture. Think along the back of a skirt, under a cushion, or on a section that faces the wall. Apply a small amount of your cleaner to a clean, white microfibre cloth and gently dab it onto the fabric. You'll need to wait for it to dry completely, then check for any discolouration, water rings, or changes in texture. If it looks exactly as it did before, you're good to go.
A personal rule I live by: skipping the spot test is a gamble with my furniture. It takes just a few minutes, but it can save you from a permanent and very expensive mistake. Never, ever skip this step.
Applying Your Cleaning Solution
How you apply the cleaner is just as crucial as the product itself. The aim is to clean the fabric without soaking it through. Oversaturation is a fast track to long drying times and potential mildew problems.
My advice is to work in small, manageable sections, about two to three square feet at a time. This stops the solution from drying out before you've had a chance to work it in. Give the surface a light mist with your spray bottle; you want the fabric to be damp, not dripping wet.
This infographic breaks down the core application process into three simple actions.
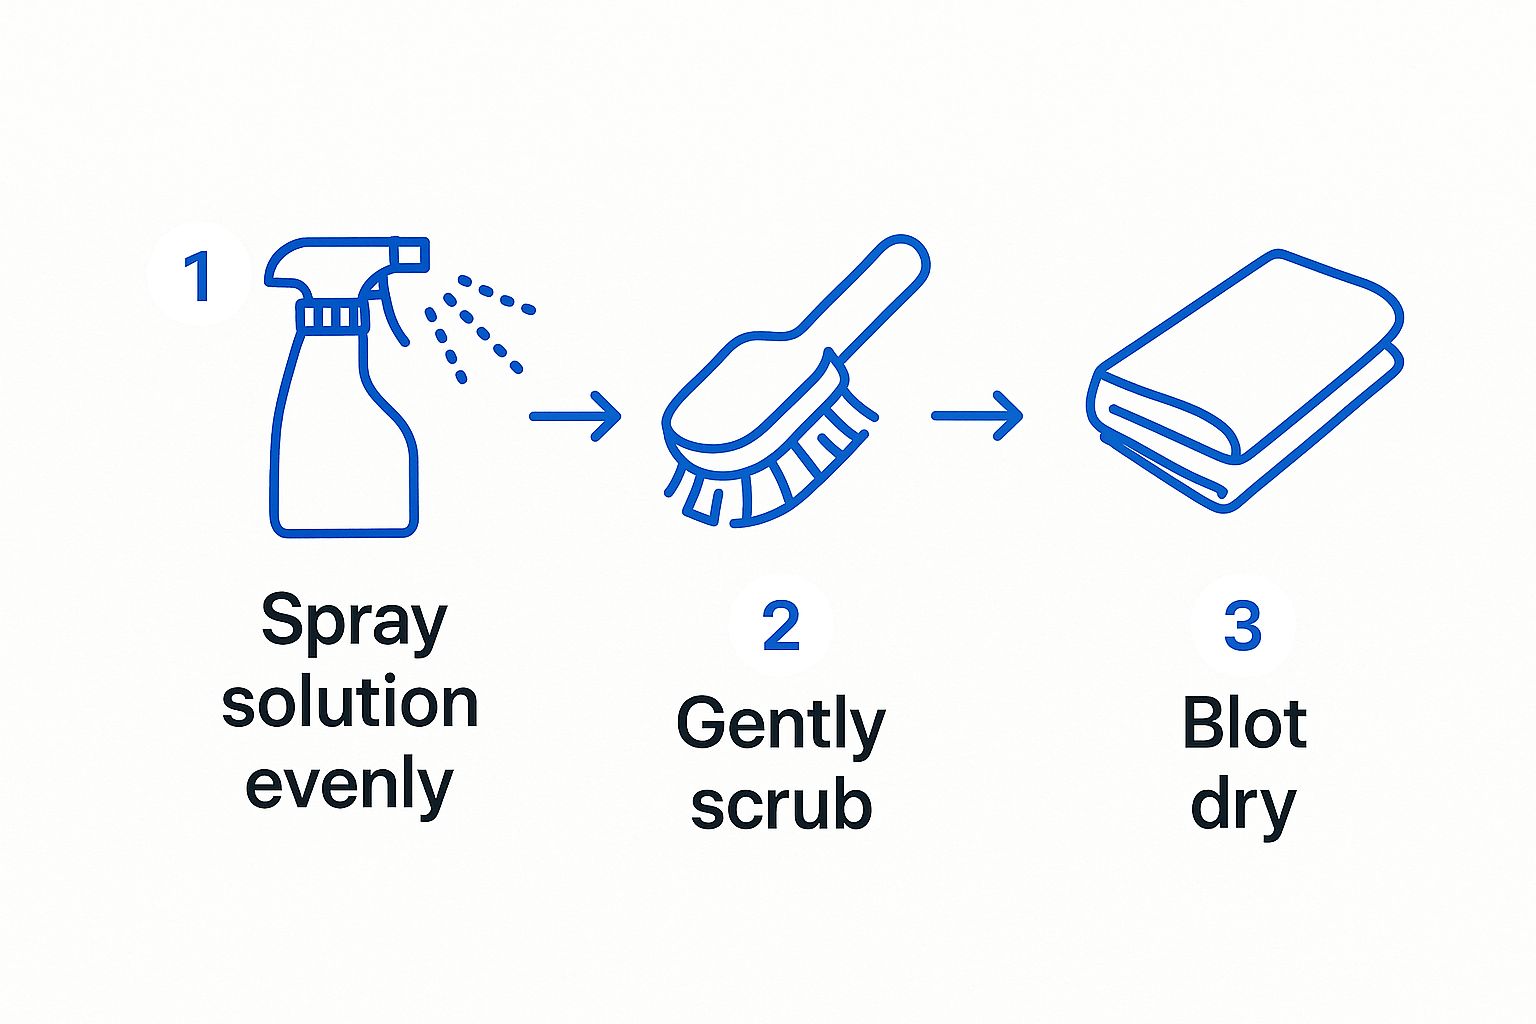
As the visual shows, it’s a simple but effective cycle: spray, gently scrub, and blot for the best results.
Using a soft-bristled brush, gently agitate the dampened area with small, circular motions. This action is what lifts the dirt away from the fibres. You'll find that many of the techniques for cleaning upholstery are similar to those used for floor treatments; our guide on the professional https://www.agcarpetspecialist.co.uk/2025/07/20/carpet-cleaning-process/ covers this in more detail.
The Blot and Rinse Technique
After agitating the area, it's time to lift away the dirt and the cleaning solution. This is where the famous 'blot, don't rub' rule is so important. Rubbing can force dirt deeper into the fabric and even damage the fibres, leaving them looking fuzzy or worn.
Take a clean, dry microfibre cloth and press it firmly into the fabric to soak up the moisture and grime. You'll literally see the dirt transferring onto the cloth.
Once you’ve blotted the section, it needs a 'rinse'. Lightly mist the same area with a spray bottle of clean, distilled water. Then, blot again with another clean, dry cloth to remove any leftover soap residue.
Finally, you must let the furniture air dry completely. This is vital for preventing musty smells. You can speed things up by opening windows or using a fan to improve airflow, but avoid using direct heat from a hairdryer or heater. While these techniques are great for home furniture, if you need specific methods for workplace items, have a look at this detailed guide on how to clean office chairs.
How to Tackle Stubborn Stains and Spills
Let's be honest, spills are just a part of life. That morning coffee that misses the mug, a greasy fingerprint on the armrest, or the dreaded splash of red wine can make your heart sink. But don't panic! Acting fast with the right know-how is the secret to getting a stain out without accidentally making it worse.
The golden rule is that different stains need different treatments. A water-based spill like tea demands a completely different approach to an oily mark from last night's takeaway. Think of this as your emergency guide for handling the most common and stubborn culprits.
The Red Wine, Coffee, or Tea Catastrophe
These water-based stains are incredibly common, and your best weapon against them is speed. The longer they’re left to sit, the deeper they soak into the fabric fibres, making your job much, much harder.
What to Do Immediately:
- Blot, Don't Rub: Grab a clean, dry, white cloth and start blotting the spill. The goal is to absorb as much of the liquid as you possibly can. Rubbing just pushes the stain deeper.
- Add a Little Cold Water: Lightly dampen a fresh cloth with cold water and continue blotting. Always work from the outside of the stain inwards to stop it from spreading.
- Bring in a Cleaning Solution: For what’s left, a simple mix of clear washing-up liquid and water or a proper upholstery cleaner will do the trick. Apply it by blotting, then “rinse” by blotting with a clean, water-dampened cloth, and finally, blot it dry.
It’s clear homeowners are keen to keep their furniture looking its best. The UK market for carpet and upholstery cleaning services hit USD 3,988.7 million in 2022 and is set to keep growing. This trend shows just how much we value our furnishings, pushing more people to learn these essential home cleaning skills. You can discover more about the growth of the cleaning services market to see what it means for homeowners.
Fighting Grease and Oil-Based Stains
Oil-based stains from food, hand cream, or general grease are a bit more stubborn because water on its own is useless against them. You need something that will actually break down and absorb the oil.
The biggest mistake you can make with a greasy stain is applying water first. Water and oil don't mix, and you'll likely just spread the greasy mark over a larger area, making it even more noticeable.
First things first, gently scrape off any excess solid gunk with a dull knife. Next, sprinkle the area generously with baking soda or even cornflour. Leave it to sit for at least 15-20 minutes; this gives the powder time to draw the oil out of the fabric.
Once the time is up, vacuum the powder away. You can then tackle any remaining mark with a dry-cleaning solvent (for fabrics with an 'S' code) or a tiny dab of washing-up liquid on a cloth for 'W' code fabrics, as it’s designed to cut through grease. Blot it clean and let it dry. These techniques are brilliant for carpets too, and you can learn more about how to remove stubborn carpet stains in our detailed guide.
When Ink Attacks Your Upholstery
A stray mark from a ballpoint pen can look like a permanent disaster, but it’s often fixable. Your best bet here is usually rubbing alcohol.
Before you go all in, always test the rubbing alcohol on a hidden spot of the fabric to check for colour-fastness. If all looks good, lightly dampen a cotton bud or the corner of a clean white cloth with the alcohol. Gently dab at the ink, taking care not to spread it. You should see the ink start to transfer from the sofa to your cloth. Keep using fresh sections of the cloth and continue dabbing until the ink is gone.
Your Upholstery Cleaning Questions Answered
Even with the best guide in hand, it’s natural for questions to pop up when you’re halfway through a job. Here, we'll tackle some of the most common queries that come up during a home upholstery clean, giving you clear answers to boost your confidence.
After all, knowing how to clean your own furniture often means knowing what to do when things don’t go exactly to plan. Let’s clear up a few common points of confusion.
How Often Should I Clean My Upholstery?
The honest answer? It really depends on how much life your furniture sees. For general maintenance and to keep dust and grit from settling into the fibres, a thorough vacuum every week or two is a great habit.
For a deep, restorative clean like the one we've covered, aiming for every 12 to 24 months is a good rule of thumb. A sofa in a busy family home with kids and pets will probably need it annually. On the other hand, a decorative armchair in a spare room could comfortably go much longer. Your furniture will often tell you when it’s time—if you start seeing visible grime or notice a faint odour, don’t put it off.
Can I Use a Steam Cleaner on Any Fabric?
Absolutely not—and this is a critical point. Steam cleaners are powerful because they use high-temperature water, which also makes them completely unsuitable for many types of fabric. They should only ever be used on furniture with a ‘W’ (water-based) or ‘W/S’ (water or solvent) cleaning code.
Trying to steam an ‘S’ (solvent-only) or ‘X’ (vacuum-only) fabric is a recipe for disaster. You risk causing irreversible damage, from shrinking and severe water spots to permanent colour bleeding. Always, always check that tag first.
One of the most frequent DIY mistakes is assuming a steam cleaner is a universal solution. It's powerful, but that power can easily ruin delicate, solvent-only materials. Check the code, every single time.
Why Does My Sofa Smell Musty After Cleaning?
That musty, damp smell almost always points to one thing: too much moisture was used, and it didn't dry properly. This is easy to do if you oversaturate the fabric during cleaning or if the room has poor airflow, trapping the dampness inside the cushions.
To fix it, you need to improve the ventilation immediately. Open the windows, get a fan blowing directly across the surface, or run a dehumidifier in the room. Next time you clean, use less water and be more thorough with that final blotting step to pull out as much moisture as you can before leaving it to air dry. These same principles apply to carpets, and our carpet cleaning tips can give you some more useful pointers.
How Do I Clean Delicate Fabrics Like Velvet?
Delicate materials like velvet, silk, or chenille demand extreme caution. Many of these will have an ‘S’ code, which means they can only be treated with a dry-cleaning solvent. Water is the enemy here; it can crush the pile on velvet, leaving permanent marks, and cause nasty water stains on silk.
For these fabrics, the safest and wisest choice is usually to call in a professional. If you absolutely must tackle a very small, fresh spot yourself, use a dedicated solvent-based cleaner, do a meticulous spot test somewhere hidden, and apply it sparingly by gently blotting.
Feeling like a job is too big or the fabric too delicate? The team at AG Carpet Specialists has the professional equipment and expertise to handle any challenge, ensuring your furniture is cleaned safely and effectively. Find out more and get your free quote at https://www.agcarpetspecialist.co.uk.



