

Cleaning your limestone floors isn't like cleaning regular tiles. It demands a gentle touch, using pH-neutral cleaners and soft microfibre mops to stop any etching or scratching from happening. You must never use acidic products like vinegar or bleach. They will permanently damage the stone's delicate surface, and there's no going back from that.
Proper care is all about protecting its natural beauty and making sure it lasts for years to come.
Why Limestone Floors Need Special Care
Limestone is a stunning but sensitive natural stone. Understanding its unique properties is the first step towards looking after it correctly. Unlike man-made tiles, limestone is a sedimentary rock formed from calcium carbonate. This makes it naturally soft and, crucially, very porous.
Think of its surface as being a bit like a sponge. This porosity is exactly why it's so easily stained or etched by everyday household spills. A bit of spilt red wine, a drip of coffee, or a splash of lemon juice can be absorbed in seconds, leading to lasting discolouration. Acidic liquids are the worst offenders because they react with the calcium carbonate and literally eat away at the stone, leaving a dull, etched mark.
Limestone’s porous nature means that what you don’t use on it is just as important as what you do. Aggressive cleaning with the wrong products can cause irreversible damage in seconds, turning a simple cleaning task into a costly restoration project.
Finishes Affect Your Cleaning Method
The finish of your limestone also plays a big part in how you should clean it. Each type has its own characteristics that change how it deals with dirt and moisture.
- Honed Finish: This gives a smooth, matte or satin look. It's great at hiding minor scratches, but its less reflective surface can be more likely to absorb stains if it isn't sealed properly.
- Polished Finish: A high-gloss, reflective surface that looks incredibly luxurious. While the polishing process helps to close some of the stone's pores and makes it a bit less absorbent, it is extremely vulnerable to etching. Acidic spills will dull that polished finish in an instant.
- Tumbled Finish: This offers a rustic, aged look with soft, rounded edges. Its textured surface is brilliant at hiding daily dirt, but it can also trap grit more easily, so you'll need to be diligent with sweeping to prevent scratches.
The Rise of Specialist Care
Understanding these details is why proper maintenance is so critical. A simple mistake, like grabbing a standard all-purpose cleaner, can lead to permanent damage. This need for specialised knowledge has led to growth in the cleaning industry. In fact, the UK cleaning sector has seen significant growth over the past decade, with a clear rise in demand for stone floor maintenance. You can find out more about this trend and what's driving it on Policybee.
This foundational knowledge helps you choose the right tools and techniques for the job. For more detailed guidance, take a look at our comprehensive article on professional limestone flooring cleaning services. By avoiding these common mistakes, you can keep your floor looking its absolute best for years.
Your Essential Limestone Cleaning Toolkit

Before you even think about getting your limestone floors wet, let's talk about your toolkit. Getting the supplies right is absolutely non-negotiable. Using the wrong product isn't just a waste of time; it can cause lasting, irreversible damage.
Your standard all-purpose cleaner or a bottle of vinegar is the absolute enemy here. Because limestone is a calcium-based stone, the acid in these common cleaners will literally eat away at the surface, leaving dull spots known as etches.
Building the right kit is all about ensuring every clean is safe and effective. You don't need a huge arsenal of products, just the right tools for the job. This means prioritising gentle materials and pH-neutral formulas designed specifically for natural stone.
The single most crucial item in your kit will be a pH-neutral cleaner. This type of solution is formulated to clean grime and dirt effectively without reacting with the calcium carbonate in the limestone, preserving its beautiful finish and structural integrity.
Core Cleaning Supplies
For your regular, day-to-day cleaning routine, these are the items you'll reach for time and again. They are gentle on the stone but tough enough for everyday dirt.
- pH-Neutral Stone Cleaner: Look for products that are explicitly labelled for use on natural stone or limestone. Brands available in the UK, such as Lithofin Wash & Clean, are a great choice as they're made to clean without stripping essential sealants or harming the stone itself.
- Microfibre Mop: A high-quality, flat-headed microfibre mop will quickly become your best friend. Its soft fibres are brilliant at trapping dirt and dust without being abrasive, and it allows you to clean with minimal water, which is key to preventing saturation.
- Soft-Bristled Brush: For getting into grout lines or tackling a particularly stubborn spot, a brush with soft, pliable bristles is perfect. It's crucial to avoid stiff, hard brushes that can easily scratch the limestone. An old toothbrush can work wonders for small, detailed areas.
Advanced and Specialised Tools
Beyond the weekly clean, a few extra items can help you tackle specific problems and get that professional-level finish. Having these on hand means you’re prepared for anything from spills to deep-set stains.
Using distilled water for your cleaning solution, for instance, can make a surprising difference. Tap water in many parts of the UK is hard, meaning it contains minerals that can leave behind a dull, chalky film on your floor after it dries. Distilled water ensures a streak-free, residue-free finish.
Additionally, for tackling those heart-sinking stubborn stains (like oil or red wine), having a poultice powder is a game-changer. This is a fine, absorbent clay that you mix into a paste to physically draw stains out from deep within the porous stone.
Finally, a dedicated wet-dry vacuum can be a fantastic investment for a really thorough clean, helping you lift all the dirty water from the floor and grout lines with ease. This level of care is a key part of professional natural stone floor cleaning and is what guarantees a deep clean without leaving any damaging moisture behind. With these tools, you're well-equipped to maintain the beauty of your limestone for years to come.
A Gentle Routine for Weekly Floor Cleaning
Keeping your limestone floors looking their best doesn't mean hours of back-breaking work. In fact, a consistent, gentle weekly routine is your best friend. The idea is simply to lift away the dust and dirt that’s settled over the week, protecting the stone's delicate surface and keeping its natural beauty intact.
Before any water touches the floor, you absolutely must do a thorough dry clean. This is the one step you can't skip. Why? Because tiny bits of sand and grit act like sandpaper when you add a wet mop to the mix, leading to fine scratches. A quick once-over with a vacuum (using the soft brush head) or a dry microfibre dust mop is all it takes to get the area prepped.
Preparing Your Cleaning Solution
With all the loose debris gone, you're ready for the wet cleaning stage. This is where getting it right really matters. You’ll need a pH-neutral cleaner that's been specifically designed for natural stone. Just as crucial as the product itself is how you mix it.
Always have a look at the manufacturer’s instructions, but a good rule of thumb is a dilution of about one part cleaner to 20 parts warm water. It can be tempting to add a bit extra for good measure, but resist! A solution that’s too strong will leave behind a sticky film that actually attracts more dirt, undoing all your hard work.
This visual guide shows the basic process for preparing and applying your cleaning solution safely.
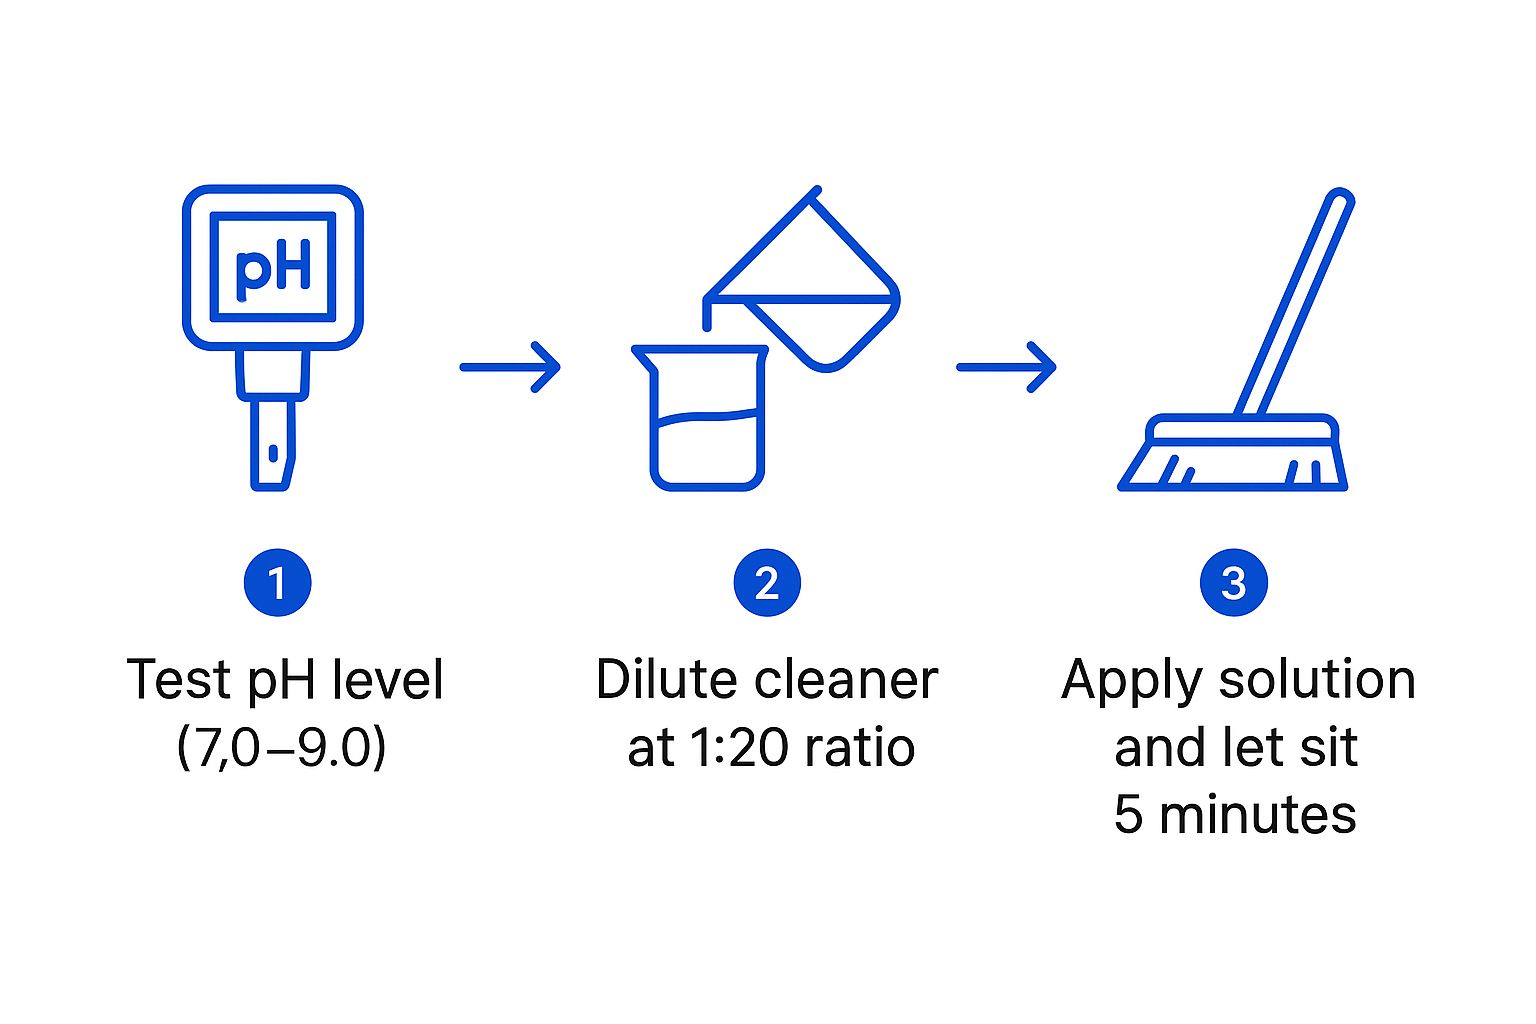
As the infographic shows, giving the solution a few minutes to sit helps break down grime without needing any aggressive scrubbing.
The Two-Bucket Mopping Method
To make sure you’re actually cleaning the floor and not just pushing dirty water around, the 'two-bucket' method is a game-changer. It's a simple technique that makes a world of difference.
- Bucket One: This is for your properly diluted pH-neutral cleaning solution.
- Bucket Two: Fill this one with clean, plain warm water. This is your rinse bucket.
Dip your microfibre mop into the cleaning solution and wring it out until it’s just damp, not dripping. Mop a small section of the floor, then rinse the mop thoroughly in the clean water bucket before dipping it back into the cleaning solution. This ensures you’re always working with a clean mop and fresh solution. While this is perfect for stone, other surfaces have their own quirks; for example, you can discover some very different but valuable https://www.agcarpetspecialist.co.uk/2025/06/24/carpet-cleaning-tips/ for another common flooring type.
For a perfect, streak-free finish, always do a final rinse. Empty your buckets, refill one with fresh, clean water, and go over the entire floor one last time with a damp mop to pick up any leftover cleaner.
This simple routine is at the heart of good stone care. If you want to dive deeper and understand the specific needs of different natural stones, we highly recommend reading these expert tips and a complete guide on how to clean natural stone floors.
Finally, let the floor air dry completely, or use a soft, dry towel if you’re in a hurry. This will help prevent any water spots from forming.
Removing Tough Stains from Your Limestone
Even with the most careful weekly routine, spills are bound to happen. That sinking feeling when a glass of red wine or a splash of cooking oil hits your beautiful limestone can feel like a disaster. The good news is that most stains are manageable if you act quickly and use the right approach.
The secret is to draw the stain out of the stone, not push it deeper. Many people’s first instinct is to scrub aggressively or reach for a harsh chemical cleaner, but this will only make things worse and can permanently damage the surface. Instead, the most effective method for stubborn, set-in stains is a simple homemade paste called a poultice.
Creating and Using a Poultice
A poultice is just a thick, absorbent paste that you apply directly to a stain. As it dries, it works like a magnet, pulling the stain out of the limestone's pores and into the paste itself. You then simply lift the dried paste away. It’s a surprisingly effective trick for even the most stubborn organic or oil-based marks.
To make one yourself, you only need two basic ingredients:
- An absorbent material: Bicarbonate of soda, diatomaceous earth, or even plain talcum powder work brilliantly.
- A suitable liquid: For oil-based stains (like grease or salad dressing), use a gentle degreasing agent like ammonia. For organic stains (coffee, tea, wine), a solution of hydrogen peroxide is your best bet.
Mix your chosen powder and liquid together until you have a thick paste, about the consistency of peanut butter. Carefully spread this over the stain, making sure the paste is about a quarter-inch thick and extends just beyond the edges of the mark.
Next, cover the poultice with cling film and tape down the edges. This keeps it moist and allows it to work its magic for longer. Let it sit for 24 to 48 hours, then remove the cling film and let the paste dry out completely. Once it's hard, you can gently scrape it off with a plastic scraper and wipe the area clean with a damp cloth. For really deep stains, you might need to repeat the process.
Tackling Dirty Grout Lines
Nothing makes a clean floor look grubby quite like dirty grout. Since grout is also porous, it absorbs dirt and spills just as easily as the stone. The real challenge is cleaning it without damaging the delicate limestone tiles on either side.
Your best tool for this job is a soft-bristled brush—an old toothbrush is perfect. Mix a pH-neutral cleaner with a small amount of water to create a cleaning paste. Apply it directly to the grout lines and scrub gently.
A word of warning: never use a wire brush or a highly acidic grout cleaner. These will scratch and etch the limestone, causing permanent damage that’s far worse than the dirty grout you started with.
After scrubbing, wipe the area with a clean, damp cloth to lift away the grime and any cleaning residue. This careful approach gets your grout clean without compromising your beautiful stone floor. In fact, many principles of gentle cleaning apply throughout the home; understanding the benefits of an environmentally safe carpet cleaner, for example, helps maintain a healthier living space overall.
The need for these specialist skills is growing. In 2023, UK construction output saw a 2% increase, driven almost entirely by an 8.3% rise in repair and maintenance work. With limestone being a popular choice in renovations, the demand for professional stone care continues to climb. You can explore more insights on the UK’s industrial cleaning sector on IBISWorld.
Long-Term Protection and Maintenance Habits
Giving your limestone a good clean is only half the story. If you want to really protect your investment, you need to think about long-term care. A truly stunning limestone floor is the result of proper sealing combined with good daily habits. Without both, even the best cleaning routine will struggle to keep up with everyday life, leaving your beautiful stone at risk.
Sealing is, without a doubt, the most important thing you can do to protect your floor. A high-quality sealant works by soaking into the tiny pores of the limestone, creating an invisible shield that stops spills from being absorbed. This barrier buys you crucial time to wipe up messes before they have a chance to stain or etch the surface. It’s like a raincoat for your floor—liquids just bead up on the surface instead of sinking in.
Choosing the Right Sealant
You’ll quickly find that not all sealants are the same, and picking the right one is key to keeping your floor looking its natural best. They generally fall into two main categories:
- Impregnating Sealers: These are the ones we recommend for limestone. They soak right into the stone, protecting it from the inside out without changing how it looks or feels. They're perfect for maintaining that natural matte or honed finish.
- Topical Sealers: These create a film over the top of the stone, a bit like a varnish. While they can give a high-gloss look, they often stop the stone from breathing and can trap moisture, which is a big no-no for natural stone like limestone.
For almost any limestone floor, an impregnating sealer is the way to go. It offers fantastic protection while respecting the stone’s authentic character.
Knowing When to Reseal Your Floor
That protective seal won't last forever. Everyday foot traffic, cleaning, and general wear and tear slowly break it down. As a rule of thumb, a limestone floor typically needs resealing every 2-5 years. However, if it's a high-traffic spot like a kitchen or hallway, you might need to do it more often.
How do you know when it’s time? The water drop test is your best friend here. Just splash a few drops of water onto the floor and watch what happens for a couple of minutes. If the water beads up, the sealant is still doing its job. If it soaks in and darkens the stone, your protective barrier is gone, and it’s time to get it resealed.
Proactive Daily Habits
Beyond sealing, it’s the small, consistent things you do every day that make the biggest difference in preventing damage. Building these simple habits into your routine will dramatically cut down on the need for deep cleaning later on.
- Use Quality Doormats: A good mat at every entrance will trap the grit and dirt that can act like sandpaper on your floors.
- Apply Furniture Pads: Stick some felt pads under the legs of your chairs, tables, and sofas. It’s a simple fix that prevents scratches when things get moved around.
- Act on Spills Immediately: This one is non-negotiable. The faster you blot up a spill—especially acidic ones like wine, coffee, or juice—the less chance it has to damage the stone. The need for quick action is a universal truth for any surface; for example, our guide on cleaning pet urine in carpet stresses the same principle.
This proactive mindset is what will keep your limestone floors looking resilient and beautiful for years, not just months.
Common Questions on Limestone Floor Care
Even with the best cleaning routine in place, a few specific questions always seem to pop up when looking after limestone. It's a gorgeous natural stone, but it has its own set of rules, and it’s completely normal to feel a bit hesitant before tackling certain jobs. Let's go through some of the most common queries I hear, so you can feel more confident about your floor care.
A big one for many homeowners is weighing up the cost of professional help versus going the DIY route. While your day-to-day cleaning is perfectly manageable, deep cleaning and restoration are jobs that really benefit from an expert hand. On average, professional limestone floor cleaning will set you back between £3 and £5 per square metre, which can vary depending on the floor's condition and size. Since limestone is so easily damaged, bringing in a specialist is a smart investment to preserve your floor and avoid much more expensive repairs down the line. You can get a broader idea of how pricing works by looking at these insights on general building cleaning.
This often leads people to ask about specific tasks and when it’s genuinely time to call in a pro.
Can I Use a Steam Mop on My Limestone Floor?
This is a firm "no," and it's a question I get asked all the time. You should never use a steam mop on limestone. The combination of intense heat and high-pressure steam is far too aggressive and will quickly strip away the protective sealant. Once that's gone, the porous stone is left wide open to stains, spills, and moisture damage.
Worse still, repeated use can cause thermal shock, creating tiny micro-fractures within the stone itself. It's always best to stick with a well-wrung-out microfibre mop and a gentle, pH-neutral cleaner.
Using a steam mop is one of the fastest ways to undo all the benefits of a good sealant. It effectively wipes out your floor's main line of defence against everyday grime.
How Often Should I Reseal My Limestone Floors?
Resealing is vital for long-term protection, but the timing isn't set in stone. As a general rule of thumb, most limestone floors will need to be resealed every 2 to 5 years. How often really depends on foot traffic and the quality of the sealer that was originally applied. A busy kitchen floor, for example, will need attention much sooner than one in a rarely used guest room.
There’s a simple test you can do to check if it's time:
- Put a few drops of water onto the stone in a high-traffic area.
- Leave it for a few minutes and watch what happens.
- If the water beads up nicely on the surface, your sealant is still doing its job.
- If the water soaks in and darkens the stone, it's time to reseal to keep stains at bay.
What Is the Best Way to Fix Minor Scratches?
For very light, surface-level scratches, you might have some luck buffing them out yourself. You'll need a specialised stone polishing powder (sometimes called honing powder) and a soft, damp cloth. The process gently abrades the surface, which can be enough to smooth out a very minor mark.
However, if you can feel the scratch with your fingernail, or if you're dealing with widespread dull patches, it’s best to consult a professional stone restoration service. They have the proper diamond-polishing equipment needed to hone the surface evenly without causing further damage.
For a professional assessment of your limestone floors or any other specialist cleaning needs in Cheltenham or Gloucester, trust the experts at AG Carpet Specialists. We provide tailored solutions to restore and protect your beautiful natural stone. Contact us today for a free quotation



