

Trying to find the best way to clean carpets at home isn’t just about getting rid of the dirt you can see. It's really about looking after your family’s health and protecting the investment you've made in your home. The most effective method, from my experience, is a two-pronged attack: consistent vacuuming combined with periodic deep cleaning, whether that’s with a proper carpet cleaning machine or just some targeted, eco-friendly solutions for spills and stains. This simple strategy keeps your carpets fresh, helps them last longer, and makes your home a healthier place to be.
Why Regular Carpet Cleaning Matters More Than You Think
It’s so easy to forget about what you can’t see. You might run the vacuum over the floor and pick up the obvious crumbs and pet hair, but your carpet is basically a giant filter for your home, trapping all sorts of invisible particles deep down in its fibres. You'd be surprised at how much these hidden nasties can affect your day-to-day life.
A good, consistent cleaning routine is about so much more than just appearances; it's a vital part of keeping your indoor air quality high.
- It Traps Airborne Pollutants: Carpets are brilliant at capturing dust, pollen, pet dander, and other allergens that would otherwise just float around in the air you breathe.
- It Can Harbour Bacteria: Any spills or dampness can quickly become a breeding ground for bacteria and even mould if they aren't dealt with properly.
- It Absorbs Odours: Over time, carpets can soak up smells from cooking, pets, or smoke, leaving your home with a lingering stale scent.
Protecting Your Flooring Investment
Looking beyond the health aspect, proper care is just plain essential for protecting the money you've spent on your flooring. Think about it: tiny particles of grit, sand, and soil get tracked in every day. With every footstep, these particles act like sandpaper, grinding away at the carpet fibres. This friction is what makes carpets look dull and matted long before they should.
Giving your carpets a regular deep clean lifts out all that embedded grit, stopping the fibres from breaking down prematurely. This simple bit of maintenance can genuinely add years to the life of your carpet, keeping it feeling soft and looking great. Ultimately, working out how often to clean your carpets is the key to finding that perfect balance between cleanliness and preservation.
A Growing Focus on Home Hygiene
We've all become much more focused on creating cleaner, healthier homes, and that shift is definitely reflected in the carpet cleaning industry. Hygiene and allergen control are now huge drivers for our business. In fact, the UK carpet and upholstery cleaning market hit revenues of around £3.15 billion back in 2022, and carpet services accounted for over 72% of that. This isn’t just a statistic; it shows a real collective understanding that clean carpets are a cornerstone of a healthy living space.
A well-maintained carpet isn't just a decorative floor covering; it’s an active part of your home’s ecosystem. When you look after it, you're ensuring it contributes positively to your family's well-being and the longevity of your home's interior.
Assembling Your Home Carpet Cleaning Toolkit
Before you even think about tackling a spill or starting a deep clean, getting your gear together is the most important first step. I’ve seen it countless times – being prepared is what separates a minor clean-up from a permanent stain. Acting fast and effectively is the real secret to keeping carpets looking their best.
Your toolkit needs more than just a good vacuum cleaner. While a vacuum is brilliant for everyday surface dirt, you'll need a few extra bits in your arsenal to do a proper job.
-
High-Quality Microfibre Cloths: These are absolutely essential for blotting up spills. Their incredible absorbency wicks liquid up and away from the carpet fibres, and they won't leave any annoying lint behind. Just remember the golden rule: always blot, never rub.
-
A Stiff-Bristled Brush: A small, handheld brush is your best friend for working cleaning solutions into stubborn spots or gently loosening dried-on mud. It helps the cleaner get right down into the pile for a much better result.
-
A Spray Bottle: When you're using homemade or diluted cleaners, a simple spray bottle gives you that fine, even mist you need. This helps you avoid soaking the carpet, which can lead to bigger problems like mould or water stains.
Choosing the Right Cleaning Agents
The solutions you use are every bit as important as your tools. I've been called out to jobs where the wrong product has actually set a stain permanently, bleached the carpet's colour, or left behind a sticky mess that just attracts more dirt.
For any home with pets or children, an enzyme cleaner is a non-negotiable. These products use natural enzymes to literally break down and digest the organic proteins found in stains like pet urine, sick, or blood. This doesn't just remove the mark; it completely eliminates the odour that can lead to pets having repeat accidents in the same place.
For more general spills like fizzy drinks or muddy footprints, a simple pH-neutral cleaner is usually your safest and most effective bet. You can even whip up a perfectly good one using things you already have in the kitchen cupboard.
My personal rule of thumb is to always have two main solutions ready: a reliable enzyme cleaner for organic emergencies and a gentle, all-purpose spot cleaner. This simple preparation has saved my carpets from disaster more than once.
Before we dive into the nitty-gritty of cleaning techniques, it’s worth comparing the stuff you can make at home against the professional-grade solutions we use in the trade. Each has its place, and knowing when to use what can make all the difference.
DIY vs Professional Cleaning Solutions
| Solution Type | Best For | Pros | Cons |
|---|---|---|---|
| White Vinegar & Water (DIY) | Light stains, neutralising odours, general freshening up. | Very cheap, eco-friendly, readily available. | Can be too acidic for some natural fibres (like wool), distinctive smell. |
| Bicarbonate of Soda (DIY) | Absorbing greasy spills, deodorising dry carpets. | Excellent at absorbing odours and moisture, gentle on fibres. | Can be messy to clean up, not effective on set-in stains. |
| Enzyme Cleaner (Pro/DIY) | Organic stains (pet urine, blood, sick, food spills). | Breaks down the stain source, completely removes odours. | More expensive, needs time to work (can't be rushed). |
| pH-Neutral Spot Cleaner (Pro) | General spots & spills (drinks, mud, non-greasy food). | Formulated to be safe on most carpet types, no sticky residue. | Can be less effective on very specific or old stains. |
| Professional Extraction Shampoo (Pro) | Deep cleaning with a machine, heavy overall soiling. | Lifts deep-seated dirt, often contains anti-resoiling agents. | Requires a carpet cleaning machine, can leave residue if not rinsed. |
While kitchen staples like bicarbonate of soda and white vinegar are fantastic for neutralising smells and tackling many common household stains without harsh chemicals, professional solutions are formulated for specific, powerful results. Being well-equipped with a mix of both transforms a cleaning emergency into a completely manageable task.
Your Guide to Deep Cleaning Carpets Like a Professional
When a quick vacuum just won't do, it's time to bring out the big guns. For that truly deep, satisfying clean that gets right down to the base of the fibres, nothing beats a rental carpet cleaning machine. This method, often called hot water extraction, tackles the embedded grit and grime that your regular hoover simply leaves behind.
With a bit of know-how and the right technique, you can get results that honestly rival a professional job, all while saving a good bit of cash. The secret is to be patient and methodical. Don't rush it.
Master the Preparatory Work
Before you even think about filling that machine with water, there's some groundwork to do. I can't stress this enough: what you do before the deep clean will account for at least 50% of your final result. Skipping this stage is the number one mistake people make.
First up, give the room the most thorough vacuuming of its life. I mean it. Go over the entire carpet slowly, and then do it again from a different direction—go north to south, then switch to east to west. This lifts out as much of that loose, dry soil, dust, and pet hair as possible. If you don't, you're just creating mud the second you add water.
Next, it's time to play detective and pre-treat any stubborn stains you see. Grab a good spot cleaner, apply it to the stain, and gently work it into the fibres with a soft brush or cloth. Let it sit for a good 10-15 minutes. This gives the cleaner a head start, breaking down the stain before the main event begins.
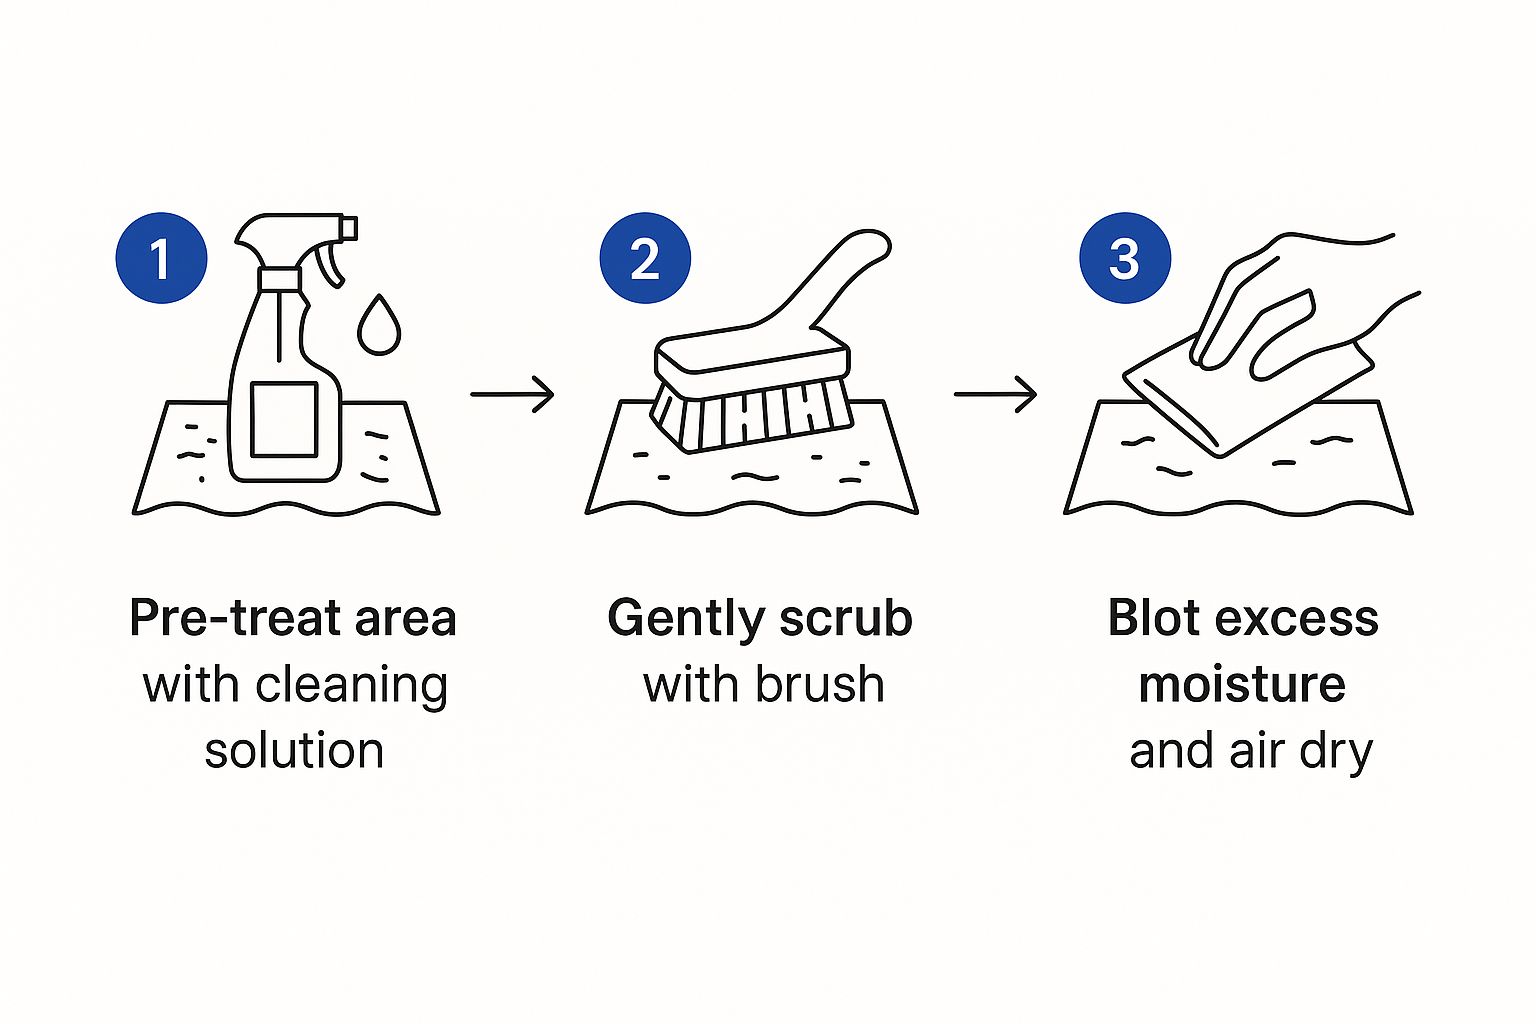
By dealing with these obvious spots first, you let the machine focus on what it does best: lifting the general, widespread dirt across the whole carpet. This ensures a much more even and impressive finish.
Using the Machine with Pro-Level Technique
Right, you've got your rental machine. Definitely have a read of the instructions, but keep these tips from the field in mind. When mixing your cleaning solution, follow the directions on the bottle to the letter. A classic DIY blunder is adding a bit of extra soap "for good luck." All this does is leave behind a sticky residue that acts like a magnet for new dirt.
Start in the corner of the room that's furthest from the door. You don't want to walk all over your lovely clean carpet, creating a path of footprints. Plan your escape route! Work in methodical, straight lines.
- The Forward Pass: As you push the machine forward, press the trigger to release the hot water and cleaning solution. Move at a slow, steady pace to give it time to work.
- The Backward Pass: Now, release the trigger and pull the machine back over the exact same path. This is the suction-only pass, designed to pull all that dirty water out. Go even slower on this backward stroke—the more water you extract, the better.
Make sure you overlap each new line by about a third. This simple trick prevents you from getting those ugly, streaky lines and gives you that uniform, professional look.
The All-Important Rinsing Pass
Here’s a little secret that the rental instructions often leave out: the rinsing pass. Once you've cleaned the entire room with the solution, it's time for one more round. Empty the machine's tanks completely, and then refill the clean water tank with only clean, warm water. No more soap.
Go over the entire carpet again, using the exact same forward-and-back technique. This final pass is crucial for rinsing out any lingering soap residue. It not only stops that sticky feeling underfoot but also helps your carpet stay cleaner for a lot longer. For a more in-depth look at this, you might be interested in our detailed guide on how to deep clean carpets at home.
Finally, do everything you can to get that carpet dry as quickly as possible. Throw open the windows, get some fans blowing across the surface, or set up a dehumidifier. The faster it dries, the less chance there is of any musty smells developing. Follow these steps, and you’ll be able to stand back and admire a carpet that looks and feels professionally cleaned.
Effective Natural Cleaning Solutions You Can Make at Home

If you're keen to avoid harsh chemicals, you don't have to give up on effective cleaning. Believe it or not, some of the best ways to clean carpets at home rely on simple, eco-friendly ingredients you probably already have in your kitchen. This approach is ideal for any home, especially those with young children and pets.
Mixing your own cleaners is not only cheaper but also gives you total control over what you're putting on your floors and into the air. When it comes to natural cleaning, the two undisputed champions are white vinegar and bicarbonate of soda—they form the backbone of most DIY carpet solutions.
The All-Purpose Bicarbonate of Soda Refresher
One of the simplest ways to freshen up a room is with a dry carpet deodoriser. This is a brilliant method for soaking up lingering smells from pets or cooking, all while giving the carpet pile a gentle lift without a drop of moisture.
Just mix about 200g of bicarbonate of soda with 10-15 drops of your favourite essential oil. Lavender or lemon work beautifully for a clean, fresh scent. Sprinkle the mixture evenly across your entire carpet, let it sit for at least 30 minutes (or even a few hours for stubborn odours), then vacuum it up thoroughly. The difference is incredible.
Crafting a Powerful Vinegar Spot Cleaner
For those inevitable spills and spots, a white vinegar solution is a fantastic weapon to have in your arsenal. Its natural acidity is great for breaking down many common stains without damaging most modern synthetic carpet fibres.
To whip up a simple but potent spotter, here’s what you do:
- Mix Equal Parts: Combine equal amounts of white vinegar and warm water in a clean spray bottle.
- Spray Lightly: Gently mist the stained area. The key is not to soak it.
- Let It Sit: Leave the solution to work its magic for about 10-15 minutes.
- Blot, Don't Rub: Carefully blot the area with a clean, dry microfibre cloth. Always work from the outside of the stain inwards to stop it from spreading.
This method works wonders on everyday spills and general dirt. If you’d like more in-depth recipes, you can explore our complete guide to creating a natural carpet cleaner for different types of stains.
Crucial Safety Note: Before using any homemade solution, you must perform a patch test. Apply a tiny amount to a hidden spot, like inside a cupboard or under a sofa. Wait for it to dry completely to check it doesn't cause any colour bleeding or damage. This one simple step can save you from a costly mistake, especially with natural fibres like wool, which can react badly to acidic cleaners like vinegar.
How to Tackle the Toughest Carpet Stains
That sinking feeling when a glass of red wine tips over or a muddy boot print appears on your clean carpet is all too familiar. A sudden spill can feel like a disaster, but it doesn't have to leave a permanent mark. Swift and proper action is your best defence. The number one rule? Act fast.
Your first instinct might be to scrub furiously, but that’s the worst thing you can do. The most critical step is to blot, not rub. Take a clean, white cloth or some paper towels and press down firmly on the spill. Work from the outside of the stain inwards to stop it from spreading. Your goal is simply to absorb as much of the liquid as possible. Rubbing just pushes the spill deeper into the carpet fibres, making it a much bigger problem.
A Battle Plan for Common Carpet Culprits
Different stains need different approaches; a one-size-fits-all method just won't cut it for the really tough marks. Here are a few proven strategies for common household spills.
-
Red Wine: After blotting up as much as you can, generously cover the area with salt. The salt will slowly draw the remaining wine out of the carpet. Let it sit for a few hours (you'll see it turn pink), then vacuum it all up before dealing with any lingering discolouration.
-
Coffee or Tea: For these types of stains, blot immediately with cold water. Using hot water can actually set the stain, making it permanent. A simple mix of white vinegar and water is often very effective here.
-
Mud: This is the one instance where waiting is the best strategy. Let the mud dry out completely. If you try to clean it while it’s wet, you'll just smear it into a larger mess. Once it's dry and hard, you can break up the bigger clumps and vacuum them away before spot-treating what’s left.
The Power of Being Prepared
Having the right supplies ready can make the difference between a major drama and a minor clean-up. Keeping a small, dedicated stain removal kit is one of the smartest things a homeowner can do.
A simple kit with a few white cloths, a spray bottle of water and vinegar solution, and some bicarbonate of soda is often enough to handle over 90% of common household spills. Being prepared is half the battle.
While these home remedies are fantastic, some situations just call for a professional. The cleaning industry has become a significant part of the UK economy, contributing around £59 billion annually as more people focus on keeping their homes hygienic. With modern life getting busier, it’s not surprising that 40% of UK residents under 35 now hire professional cleaners, highlighting the value of expert services.
For those incredibly stubborn stains that have had time to set in, you may need to try something more advanced. Our guide on how to remove stubborn carpet stains offers more detailed advice for tackling difficult marks like grease or ink. Just remember to always test any cleaning solution on a small, hidden patch of carpet first.
Common Questions About Cleaning Carpets At Home
Even after you've mastered the basics, a few practical questions always seem to pop up when you're in the middle of cleaning. Let's run through some of the most common queries I hear, clearing up myths and giving you that extra bit of confidence. These are straightforward answers, based on years of hands-on experience.
How Often Should I Really Deep Clean My Carpets?
Honestly, this really comes down to what your household looks like. For a busy home with kids, pets, or just a lot of footfall, a deep clean every 6 to 9 months is a solid rule of thumb. This routine is essential for tackling the deep-seated allergens and grime that a normal vacuum just can't touch.
On the other hand, if you're in a quieter home with less traffic, you can probably stretch that out to every 12 to 18 months. Just remember, that’s for deep cleaning. Sticking to a weekly vacuuming schedule is the real secret to keeping any carpet looking its best for longer.
Can I Use A Steam Cleaner On Wool Or Natural Fibre Carpets?
You have to be very careful with this one. What most people call "steam cleaning" is actually hot water extraction, and it can be a disaster for natural fibres like wool or sisal. The combination of intense heat and moisture can lead to permanent shrinkage, colours running, or damage to the delicate fibres.
Before you do anything, check the manufacturer's cleaning instructions for your specific carpet. Synthetic carpets, like those made from nylon or polyester, usually stand up to this method just fine.
The golden rule? If you’re ever unsure, test it out first. Find a small, hidden spot—inside a wardrobe or under a piece of furniture that never moves is ideal—and see how the carpet reacts.
What Is The Biggest Mistake People Make When DIY Carpet Cleaning?
Without a doubt, the most frequent and damaging mistake I see is using far too much water and cleaning solution. Soaking your carpet is a huge problem. It can penetrate right through to the backing and underlay, creating the perfect damp environment for mould and mildew to thrive.
Using too much soap is just as bad. It leaves behind a sticky residue that becomes a dirt magnet, meaning your carpet gets grubby again in no time. To get it right, follow the machine's dilution instructions to the letter. More importantly, always do a final pass with just plain water to rinse out any remaining detergent. This one simple step is one of the best ways to ensure your hard work actually pays off. For more practical advice, check out our expert carpet cleaning tips to avoid these common pitfalls.



